Start with two numbers
30mm and 50mm describe focal length: how wide or tight the view is. f/1.8 and f/3.5 describe aperture: the relative opening that controls image illumination and influences depth of field. They are separate properties. A lens can be 30mm f/1.8, 50mm f/1.8 or another combination.
This guide starts with those numbers, follows the light through a lens, and then connects the physics to choosing equipment for real work. You do not need a professional camera to understand it. The important first question is what you want to photograph and what is stopping you from making that picture.
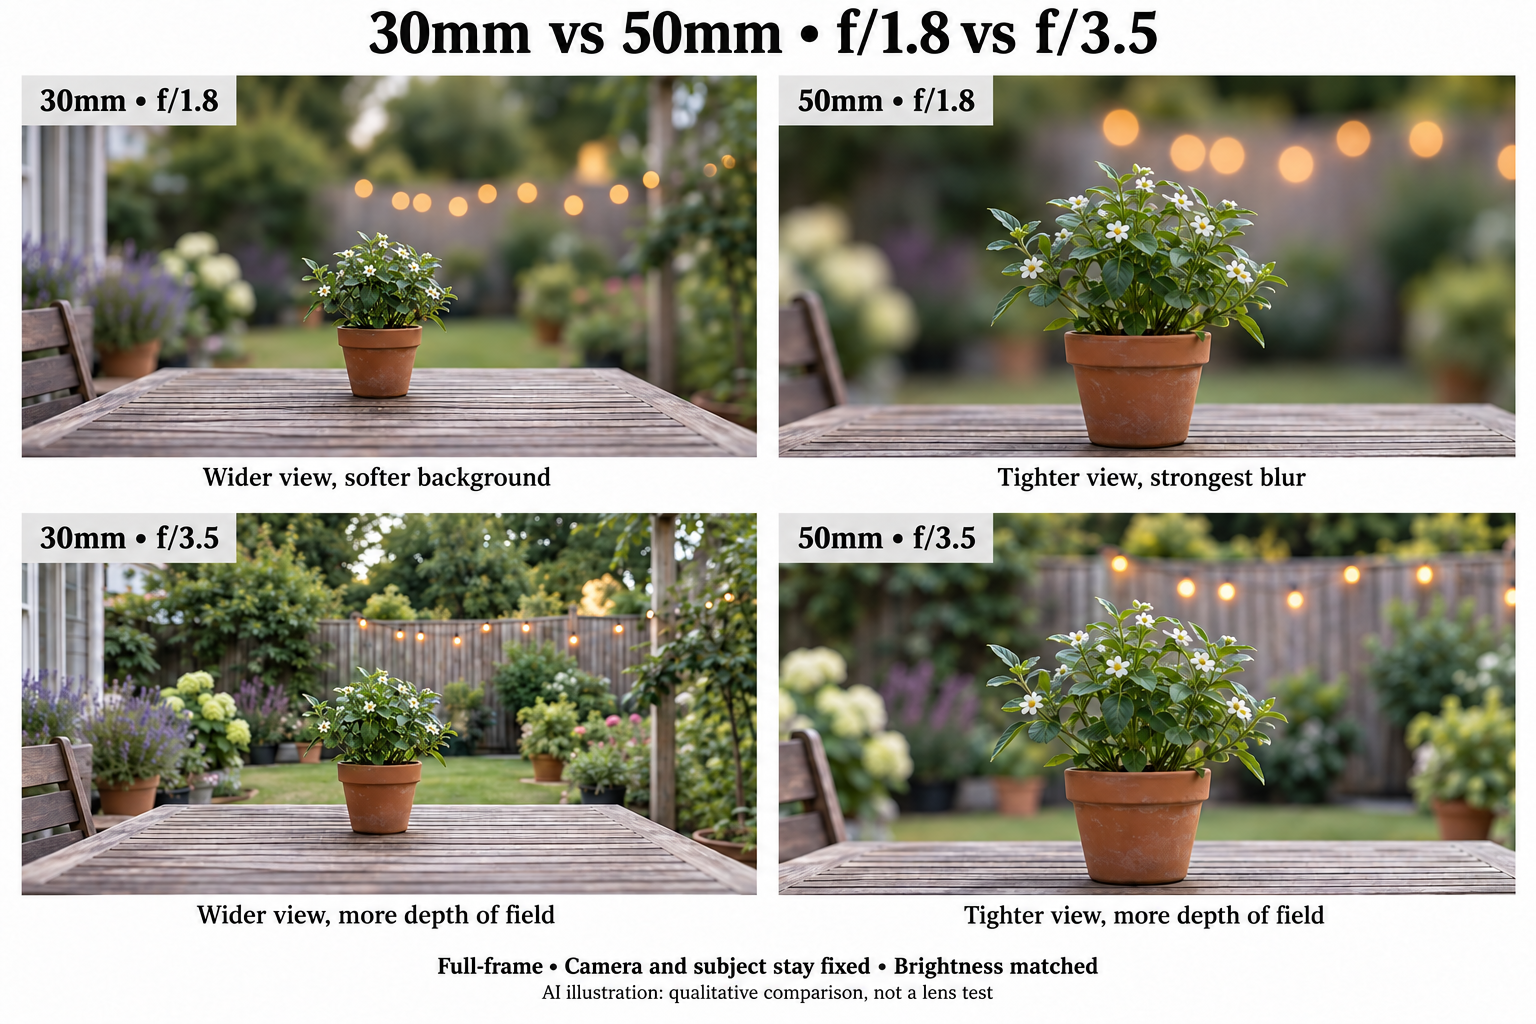
Open the complete image ↗
| Setting | View from the same position | Background appearance |
|---|---|---|
| 30mm, f/1.8 | Wider view; smaller subject | More blur than 30mm at f/3.5 |
| 30mm, f/3.5 | Same wide view | Greater depth of field |
| 50mm, f/1.8 | Tighter view; larger subject | Strongest blur under these comparison conditions |
| 50mm, f/3.5 | Same tight view | Greater depth of field than 50mm at f/1.8 |
What 30mm and 50mm mean
Focal length describes the optical system's focusing geometry. For a distant subject, it is the distance from the lens system's rear principal plane to the focused image. That plane is an optical reference and need not lie at the physical centre of the lens. A 50mm lens therefore does not have to be 50mm long. [1, 5]
On the same sensor, a shorter focal length captures a wider angle. A longer focal length captures a narrower angle and makes a distant subject larger in the image. On full frame, 30mm is moderately wide and 50mm is generally considered standard; category boundaries are approximate. [1]
Calculate the angle of view
For a conventional rectilinear lens focused at infinity, the horizontal angle of view is approximately:
θ = 2 atan(sensor width / (2f))
| Focal length | Full-frame horizontal angle | Practical view |
|---|---|---|
| 30mm | 61.9° | Wider surroundings; smaller subject |
| 50mm | 39.6° | Tighter surroundings; larger subject |
For distant subjects, image size increases approximately in proportion to focal length: 50 / 30 = 1.67. A subject is therefore about 1.67 times larger in width and height with 50mm from the same position. Close focusing and lens design can modify this comparison.
Perspective comes from viewpoint
Photograph a face with 30mm, then switch to 50mm without moving. Framing tightens while perspective remains essentially the same. But if you move closer with 30mm to fill the frame with the face, the nose becomes proportionally larger relative to the ears.
Moving farther away with a longer lens reduces those relative distance differences. The familiar telephoto compression appearance therefore comes from the more distant viewpoint commonly used with a longer lens. Curved straight lines caused by lens distortion are a separate effect.
Aperture and the light budget
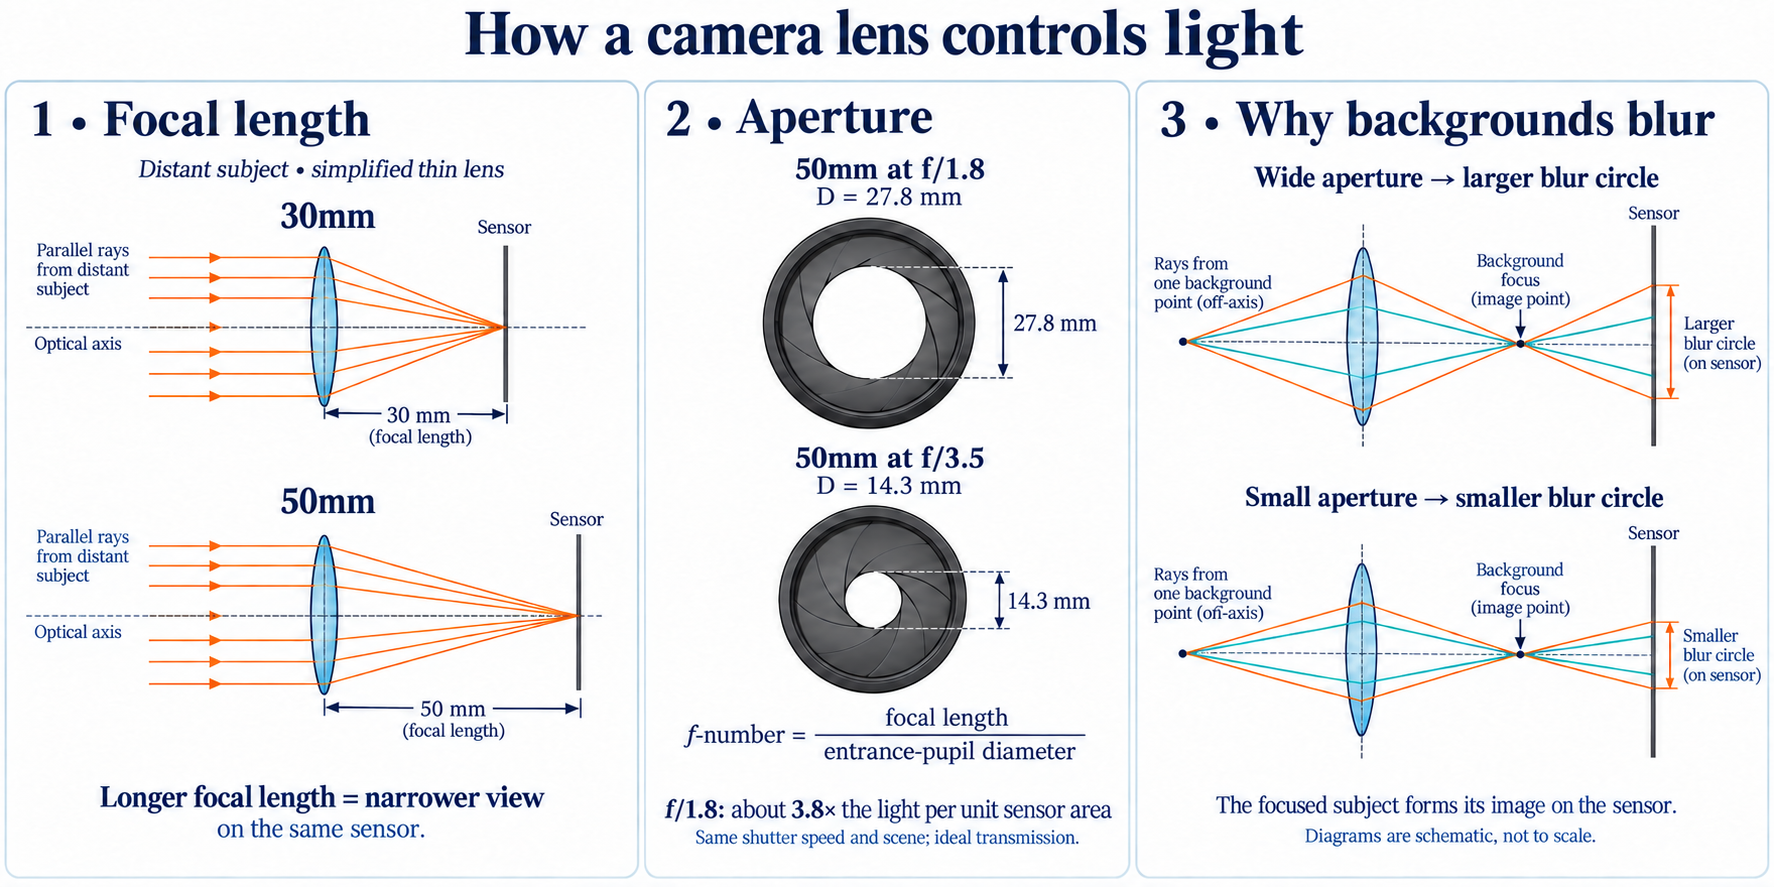
The f-number is a ratio between focal length and entrance-pupil diameter. The entrance pupil is the apparent aperture opening seen through the front optics. It is not necessarily the physical iris diameter and is unrelated to the filter-thread diameter. [2]
N = f / D → D = f / N
N = f-number; f = focal length; D = entrance-pupil diameter. A smaller denominator gives a larger opening.
| Setting | Calculation | Entrance pupil |
|---|---|---|
| 30mm at f/1.8 | 30 / 1.8 | 16.7mm |
| 30mm at f/3.5 | 30 / 3.5 | 8.6mm |
| 50mm at f/1.8 | 50 / 1.8 | 27.8mm |
| 50mm at f/3.5 | 50 / 3.5 | 14.3mm |
Almost two stops more light
For the same scene and shutter speed, ideal illumination per unit sensor area is proportional to 1/N². Real lenses lose some light through absorption and reflection.
Light ratio = (3.5 / 1.8)² = 3.78
Thus f/1.8 admits about 3.8 times as much light, or 1.92 stops more, than f/3.5. If a scene needs f/3.5, 1/125 second and ISO 800, f/1.8 allows approximately 1/500 second at ISO 800 to help freeze movement, or 1/125 second at ISO 200. These are rounded equivalents.
The full-stop sequence
f/1.4 → f/2 → f/2.8 → f/4 → f/5.6 → f/8 → f/11 → f/16
Each step right approximately halves the light. Numbers increase by √2 because aperture area depends on diameter squared. [2, 3]
The physics of focus
Open the complete image ↗
A lens focuses light through refraction. Light changes speed when it passes between air and glass. At an angled boundary, its direction changes according to Snell's law. The angles below are measured from the surface normal. [4]
n₁ sin θ₁ = n₂ sin θ₂
The refractive indices n₁ and n₂ describe the materials. Curved surfaces bend rays passing through different parts of the lens so they converge. A photographic lens uses multiple elements to form an image while reducing optical errors.
Lens elements and complete lenses
Common element shapes include biconvex, plano-convex, biconcave, plano-concave and meniscus. In air, ordinary positive elements converge light and negative elements diverge it. A photographic lens combines these elements into an overall image-forming optical system. [5]
The thin-lens equation
1/f = 1/u + 1/v
Here u is object distance and v is image distance. Distances use consistent units. This simplified model treats the lens as thin; real camera lenses require a more complete optical model. [5]
For a 50mm thin lens focused on an object 2,000mm away:
v = fu / (u − f)
v = (50 × 2,000) / (2,000 − 50) = 51.28mm
At infinity, image distance approaches 50mm. At closer distances, the required image position changes. Camera focusing mechanisms move lens elements or groups to place the focused image on the sensor.
Why the background does not share that focus
When you focus on a person, light from that person forms its sharp image at the sensor. Light from a distant background would form its sharp image at a different position. At the actual sensor, it occupies a patch instead of an ideal point - a blur circle.
Depth of field and background blur
Depth of field is the range of object distances that appears acceptably sharp. It does not mean that all points within that range have identical optical focus. [3, 6]
A wide aperture creates a broad cone of rays. Away from its focus, the cone's cross-section grows quickly. A smaller aperture narrows the cone, so the same image-plane mismatch creates a smaller blur circle. This is the geometric reason stopping down increases depth of field. [6]
| Change | Typical result with other conditions fixed |
|---|---|
| Open f/3.5 to f/1.8 | Shallower depth of field |
| Move closer to the subject | Shallower depth of field |
| Increase focal length at fixed distance | Shallower depth of field |
| Move the background farther away | More background defocus, approaching a limit |
A calculated example: focus at 2 metres
These approximate values use full frame, a conventional 0.03mm circle-of-confusion criterion and standard geometric depth-of-field equations. The camera-to-subject distance remains fixed.
| Setting | Acceptable-sharpness range | Total depth |
|---|---|---|
| 30mm, f/1.8 | 1.79-2.27m | 48cm |
| 30mm, f/3.5 | 1.63-2.59m | 97cm |
| 50mm, f/1.8 | 1.92-2.09m | 17cm |
| 50mm, f/3.5 | 1.85-2.18m | 33cm |
The transition is gradual. Large prints, close viewing and pixel-level inspection require stricter sharpness criteria, giving a smaller apparent acceptable range.
Bokeh is the character of blur
Depth of field describes acceptable sharpness around the focused distance. Background blur describes how defocused a particular background is. Bokeh describes how that blur looks: smooth or busy transitions, the shape of bright highlights, and edge behaviour. A lens can produce strong blur without producing the rendering you prefer. Aperture-blade shape, optical design and the scene all matter.
Diffraction and sensor crop
Light also behaves as a wave. Every finite aperture produces diffraction, even with perfect optics. For a circular aperture, the central Airy-disc diameter at the image plane is approximately d = 2.44λN, where λ is wavelength and N is f-number. [7]
| Aperture | Airy-disc diameter at 550nm |
|---|---|
| f/1.8 | 2.4µm |
| f/3.5 | 4.7µm |
| f/8 | 10.7µm |
| f/16 | 21.5µm |
Stopping down increases geometric depth of field while eventually reducing fine-detail contrast through diffraction. Wide-open performance can instead be limited by aberrations. The best aperture depends on the lens, sensor and required depth of field.
A smaller sensor records a smaller part of the image
Equivalent focal length describes which full-frame lens gives a similar angle of view. It does not change the lens's actual focal length. [8, 9]
Equivalent focal length = actual focal length × crop factor
| Sensor format | Crop | 30mm looks like | 50mm looks like |
|---|---|---|---|
| Full frame | 1× | 30mm | 50mm |
| APS-C, 1.5× systems | 1.5× | 45mm on full frame | 75mm on full frame |
| Canon APS-C | Approx. 1.6× | 48mm on full frame | 80mm on full frame |
Thus 30mm on APS-C gives roughly a standard view, while 50mm on APS-C gives a tighter, short-telephoto view. The actual focal length remains 30mm or 50mm.
The photographic lens family
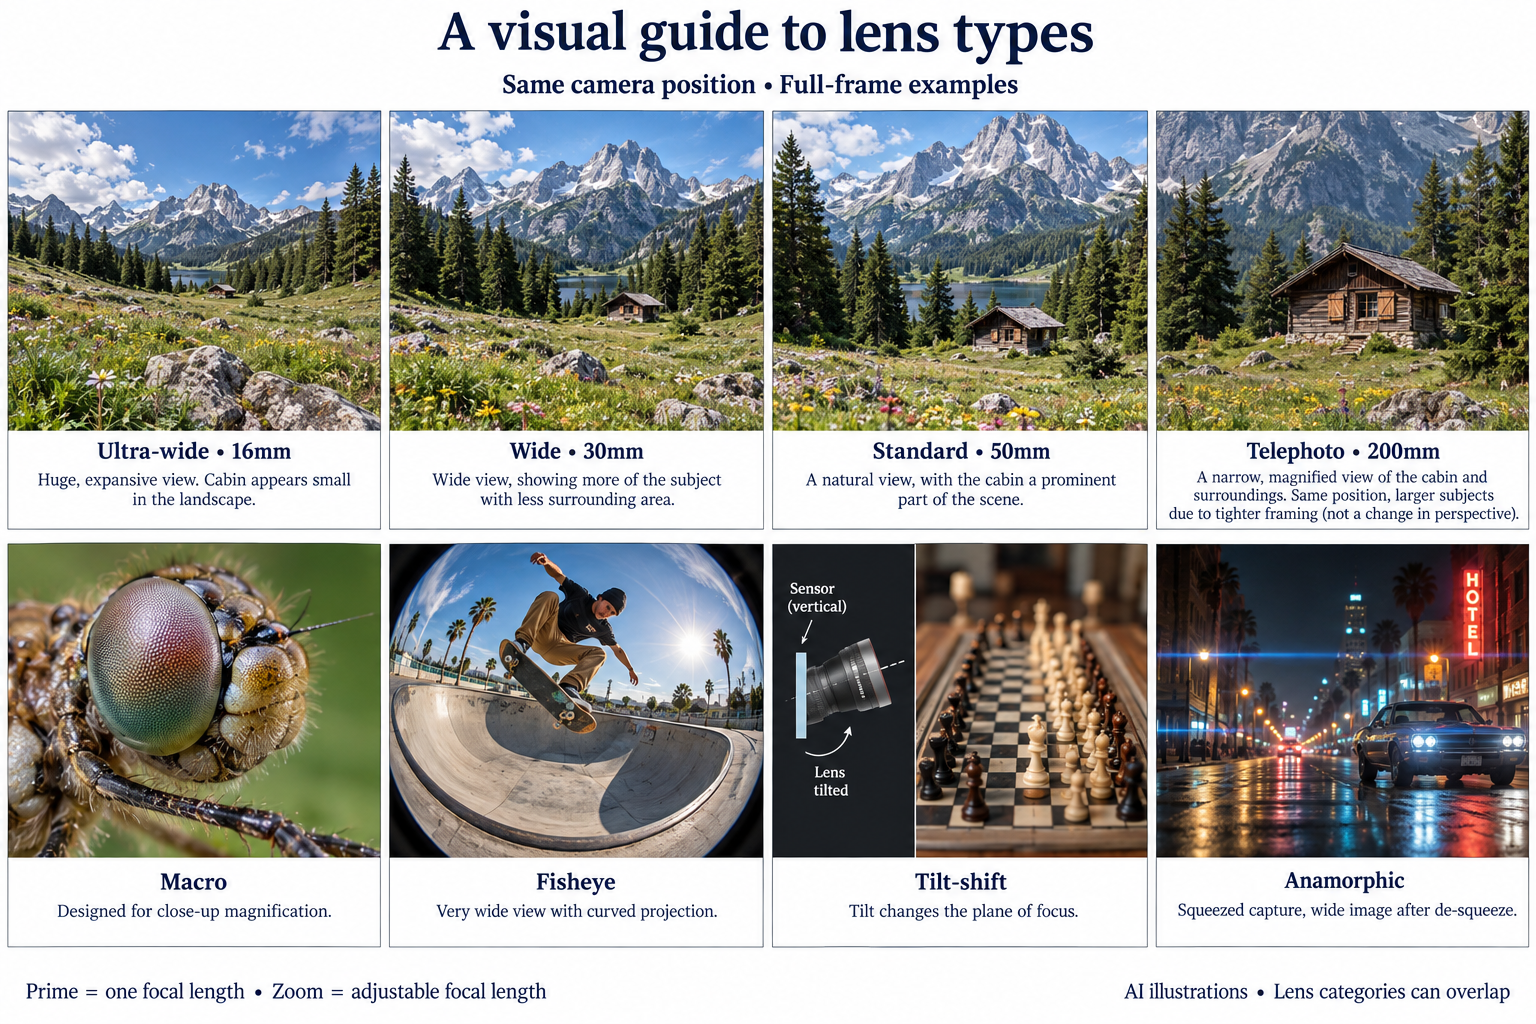
Open the complete image ↗
Focal-length ranges below are approximate full-frame conventions. Prime and zoom describe adjustment, while macro, tilt-shift and anamorphic describe capabilities or optical construction. [10, 11, 12, 13]
| Category | Meaning | Typical application |
|---|---|---|
| Ultra-wide | Roughly below 24mm; very wide view | Interiors, expansive landscapes |
| Wide-angle | Roughly 24-35mm | Street scenes, environmental portraits |
| Standard | Roughly 40-60mm | Everyday photography |
| Short telephoto | Roughly 70-135mm | Portraits, selective details |
| Telephoto | Roughly 135-300mm | Sports, distant subjects |
| Super-telephoto | Roughly 300mm and longer | Wildlife, distant action |
| Prime | One focal length, such as 30mm or 50mm | A consistent angle of view |
| Zoom | Adjustable focal length, such as 24-70mm | Reframe without changing lenses |
| Macro | Close focusing and high reproduction ratios | Insects, jewellery, small details |
| Fisheye | Extremely wide, deliberately curved projection | Immersive, exaggerated scenes |
| Tilt-shift | Tilt adjusts focus plane; shift adjusts framing | Architecture, products |
| Anamorphic | Horizontal squeeze during capture; de-squeeze afterward | Cinematic widescreen imagery |
For macro, 1:1 magnification means a 10mm subject produces a 10mm image on the sensor, independent of its later size on a monitor. [11]
Tilt can align the focus plane with an inclined surface. Shift permits reframing while keeping the camera level. Anamorphic optics can produce oval bokeh and characteristic effects depending on design. Prime or zoom alone does not establish image quality. [12, 13]
Choose your camera
Choose the camera system around your subject, working conditions and delivery requirements. A higher price or a “professional” label does not establish that a camera solves your problem. A lightweight camera you carry can be more useful than a technically superior one left at home. For paid work, repeatability and recovery from failure matter as much as peak image quality.
- Define the output. Is the result for social media, a product catalogue, a large print, a fast news deadline or graded video? Write down the required resolution, aspect ratio and file format.
- Define the difficult scene. Dim wedding reception? Birds in flight? Reflective jewellery? A one-hour interview? These impose different requirements.
- Choose the lens family first. Check the lenses you can afford, carry, rent and service. Confirm mount and sensor coverage.
- Test the body with that lens. Evaluate controls, grip, viewfinder, autofocus and image quality in your actual conditions.
- Budget for the complete workflow. Include cards, batteries, lighting or sound, support, software, storage and backups.
A starting direction
Select your main use for a practical first priority. This is an educational guide, not a model ranking.
Start with a comfortable camera and a standard zoom. Put useful focal lengths and learning ahead of a flagship body.
Camera specifications worth checking
| Specification | What to test | Why the headline number is incomplete |
|---|---|---|
| Autofocus | Track your subject in the light you actually use; check eye detection through glasses or movement. | AF-point count does not establish tracking reliability. |
| Sensor resolution | Inspect your intended output and realistic crops. | More megapixels enlarge files and storage needs; they do not repair missed focus or motion blur. |
| Burst and buffer | Shoot the file format, shutter mode and card you plan to use. | Maximum fps may restrict RAW quality, focus, exposure or duration. |
| Sensor readout | Pan and photograph rapid movement; test artificial lighting. | An electronic shutter can distort moving subjects or show banding depending on readout and lighting. |
| Stabilisation | Test handheld success with the actual lens and exposure time. | IBIS or lens stabilisation counters camera shake, not a moving subject. |
| Handling and reliability | Check grip, controls, battery access, card slots, sealing and local service. | Weather resistance is not permission to submerge equipment; ratings and lens sealing vary. |
| Video modes | Check crop, frame rate, bit depth, codec, recording heat limits, audio and power. | “4K” alone says little about autofocus, readout, colour workflow or long-take reliability. |
Manufacturer specifications are the starting point. Hands-on testing of the exact body, lens, firmware and recording mode is the deciding step. Sony’s engineering explanation describes why row-by-row exposure can distort motion; simultaneous global exposure avoids that particular mechanism. [17]
Pick a format, not a status symbol
| Camera / format | Useful strengths | Trade-offs to consider |
|---|---|---|
| Phone or quality compact | Always available; low setup time; strong computational processing. | Small sensors and fixed lens options limit some optical control; computational blur can make edge mistakes. |
| Micro Four Thirds | Often a compact system, useful telephoto portability and extensive lens options. | Equivalent framing and depth of field require crop-factor reasoning; low-light results depend on total captured light and technology. |
| APS-C mirrorless | A practical balance of body cost, lens size, image quality and action capability. | A full-frame lens changes its angle of view here; not every system has the compact lens you need. |
| Full-frame mirrorless | Broad lens choices and flexibility for low light, shallow depth of field and specialised work. | Bodies, fast lenses and complete kits can be heavier and more expensive. |
| Used DSLR system | Can offer strong still-image capability at a favourable used cost, with an optical finder. | Check condition, remaining service support, compatible autofocus, adapters and the video features you require. |
| Digital medium format | Can suit controlled studio work and demanding print detail or tonal requirements. | Cost, system weight, lens selection, data volume and action workflow can be limiting. |
These are practical trade-offs, not a quality ladder. Professionals use different formats. A larger sensor can collect more total light when framing, f-number and exposure time are matched, but sensor technology and the exact comparison matter. Compare finished images at the same output size rather than judging unlike crops.
How many megapixels?
Choose resolution from the output. A 6,000 × 4,000-pixel image is approximately 24 megapixels and prints at 20 × 13.3 inches at 300 pixels per inch before cropping. Larger viewing distances can tolerate lower print pixel density. Heavy cropping, retouching or large close-viewed prints may justify more resolution; routine online delivery usually demands less. Pixel density, autofocus and lens performance remain important.
Mirrorless or DSLR?
Compare the actual system and price available to you. Mirrorless cameras commonly offer an electronic exposure preview and on-sensor subject detection; DSLRs offer an optical viewing experience and can be attractive used. Neither label guarantees the controls, autofocus modes, battery endurance or video features you need. Test rather than assuming.
A path from beginner to professional
Beginner: learn with one system
Use the camera you have, or a comfortable interchangeable-lens body with a standard zoom. Learn exposure, focus modes, composition and basic editing. A kit zoom is a useful learning tool, not a reason to delay making photographs.
Developing: fix one recurring limit
Review missed photographs. Was the problem reach, low light, minimum focusing distance, background separation or camera handling? Buy or rent the one lens or accessory that addresses the repeated limitation.
Advanced: build a repeatable method
Develop a focused lens set, reliable autofocus technique, deliberate lighting and colour management. Test the entire capture-to-delivery workflow. Avoid replacing equipment simply because a newer model exists.
Professional: design for delivery
Add redundancy, service support, tested backups, appropriate insurance and a clear handover process. A second body or rented backup can matter more than a small improvement in resolution when a job cannot be repeated.
Lens additions should follow photographic needs. A fast standard prime can address low light; a telephoto addresses reach; a macro addresses reproduction ratio. A flash, tripod, microphone or training session may provide a larger improvement than a new camera. Nikon’s lens-selection guide takes the same subject-and-limitation approach. [15]
Camera and lens choices by profession
The focal lengths below are full-frame-equivalent unless otherwise noted. They are starting directions, not mandatory purchases. Divide the equivalent focal length by your crop factor to choose an approximate actual focal length. Match the lens to your allowed camera position, available light and delivery needs.
Portrait and headshot photography
Camera priorities: Dependable eye autofocus, comfortable tethering if needed, consistent colour and lighting compatibility.
Lens direction: Start around 50–85mm full-frame equivalent; 85–135mm can provide a comfortable tighter-portrait working distance. A 35mm-equivalent lens can include a person’s surroundings.
What to watch: Do not assume f/1.8 is always the right setting. Stop down enough for both eyes, angled faces or groups. Camera distance controls facial perspective; lighting and expression often matter more than an extremely wide aperture.
Build the kit: A suitable prime or standard zoom, a controllable light, modifier, reflector and a repeatable posing setup.
Weddings and live events
Camera priorities: Low-light autofocus, handling under pressure, reliable batteries and redundant recording where available.
Lens direction: A 24–70mm-equivalent standard zoom and a 70–200mm-equivalent telephoto cover many situations. Fast 35mm- and 85mm-equivalent primes can help in dim venues.
What to watch: Test banding under venue LEDs and restrictions on flash or shutter noise. Configure simultaneous card backup where supported; two slots alone do not guarantee duplicate files. No card setup replaces off-camera backups.
Build the kit: Two dependable bodies or a rented backup, flash if allowed, spare power and cards, and a tested ingest-and-backup routine.
Sports and motorsport
Camera priorities: Subject tracking, usable burst buffer, short exposure times and suitable readout performance.
Lens direction: 70–200mm-equivalent for closer action; 100–400mm or longer for larger fields. Indoor sports may require a faster lens than outdoor daylight work.
What to watch: Choose reach from your permitted position. High fps can produce many blurred frames if shutter speed and focus tracking are wrong. Test electronic-shutter distortion on fast lateral movement.
Build the kit: A matched action body and telephoto, appropriate cards, support where useful, weather protection and familiarity with the sport.
Birds and wildlife
Camera priorities: Animal detection where useful, handling with long lenses, reach and a practical carry weight.
Lens direction: A 100–400mm, 150–600mm or similar long equivalent range is a common direction; exact reach depends on distance and animal size.
What to watch: A teleconverter costs light and can affect autofocus and sharpness; compatibility is lens-specific. Avoid disturbing wildlife to solve a focal-length problem. Practice technique before moving to heavier specialist primes.
Build the kit: A telephoto you can actually carry, spare battery, monopod or tripod where appropriate, fieldcraft and patience.
Landscape and nature
Camera priorities: Dynamic range suited to the scene, weather practicality, good manual controls and dependable support.
Lens direction: A wide zoom around 16–35mm equivalent plus a standard zoom is versatile; a telephoto can isolate layers and distant patterns.
What to watch: Ultra-wide is not automatically more dramatic. Choose viewpoint and foreground deliberately. Very small apertures trade fine detail for depth of field; focus stacking may help static scenes when carefully executed.
Build the kit: A stable tripod, appropriate filters when needed, weather cover, spare power and a colour-managed editing workflow.
Travel and documentary
Camera priorities: Discreet operation, manageable weight, useful autofocus and a kit you can use quickly.
Lens direction: A compact standard zoom, a 24–105mm-equivalent range or a 28–35mm-equivalent prime can be practical.
What to watch: An all-in-one zoom exchanges convenience for optical and aperture compromises. Heavy equipment can reduce access and spontaneity. Plan power, storage and consent for the places and people you photograph.
Build the kit: A small reliable kit, comfortable strap, spare battery, secure copies of the day’s work and a simple cleaning kit.
Architecture and interiors
Camera priorities: Tripod work, exposure consistency, accurate composition and sufficient detail for the client’s output.
Lens direction: A rectilinear ultra-wide or wide lens is common. A shift lens becomes useful when you need controlled framing while keeping the camera level.
What to watch: Fisheye curvature is a projection choice, not the same as rectilinear wide-angle perspective. Software correction crops pixels; shift movements require adequate image-circle coverage. Watch reflections and mixed light.
Build the kit: Tripod, level, suitable wide lens, controlled bracketing when needed, and a calibrated colour workflow.
Product, jewellery and e-commerce
Camera priorities: Tethering, repeatable colour, controlled light and adequate magnification.
Lens direction: A macro lens around 60–105mm is a useful starting direction; choose working distance for the product and lighting space.
What to watch: 1:1 is a sensor reproduction ratio. Jewellery may need multiple focus planes; stacking fails if reflections or the object move. A larger megapixel count will not fix poor highlights or inconsistent white balance.
Build the kit: Macro-capable lens, tripod or stand, diffusers, flags, background and a colour reference; consistent lighting before a body upgrade.
Food and hospitality
Camera priorities: Reliable colour, tethered review when useful and a controllable working area.
Lens direction: A 35–50mm-equivalent view can show a setting; 85–105mm or a macro lens can isolate dishes and textures.
What to watch: A plate photographed at f/1.8 may have too little depth of field for the brief. Select the focus plane and aperture intentionally. Mixed daylight and artificial light can complicate colour.
Build the kit: Suitable lens, tripod, soft controllable light, reflectors and a workflow that matches the client’s intended crop.
Fashion, studio and advertising
Camera priorities: Resolution appropriate to retouching and delivery, dependable tethering, lighting integration and colour consistency.
Lens direction: Standard and short-telephoto lenses cover much studio work; specialist focal lengths follow the creative brief.
What to watch: Full frame or medium format can be useful for demanding controlled work, but budget for lenses, lights and retouching. Confirm flash sync, tethering stability and the expected delivery size before choosing a body.
Build the kit: A tested camera-to-computer workflow, appropriate lighting and modifiers, calibrated display and redundant storage.
Video, interviews and filmmaking
Camera priorities: The exact codec and frame rate, readout, heat behaviour, microphone/headphone connections and dependable power.
Lens direction: Choose focal lengths for story and working distance; a standard zoom is versatile. Cine lenses add useful mechanical controls; anamorphic lenses require a compatible monitoring and de-squeeze workflow.
What to watch: Test focus breathing, AF transitions, crop and stabilisation in the intended mode. 10-bit recording can support heavier grading, but codec, exposure and skill still matter. Audio and lighting are often the first quality bottlenecks.
Build the kit: Appropriate microphone, monitoring headphones, support, ND filters for exposure control, tested cards and power; then specialised lenses.
Astrophotography and night landscapes
Camera priorities: Low-light usability, manual focusing tools, stable support and a workflow for the planned subject.
Lens direction: A fast wide lens is a common starting point for a landscape with the night sky; tracked deep-sky work has very different telescope and mount requirements.
What to watch: Inspect coma and corner quality at the intended aperture. Exposure time is limited by apparent star motion for an untracked camera, and light pollution affects results. A tracker can matter more than changing the body.
Build the kit: Fast suitable lens, stable tripod, interval control, spare batteries and, where needed, a tracker and careful alignment.
These role-based starting points are editorial guidance derived from the optical relationships in this article and manufacturer discussions of lens selection, wildlife reach and professional recording features. They are not hands-on rankings of particular models. [10, 15, 16, 18]
Compatibility before checkout
A physically mountable combination is not automatically a fully working system. Verify the exact body, lens and adapter together.
| Check | What you need to confirm |
|---|---|
| Mount | The exact lens mount and camera mount; similar brand names do not establish compatibility. |
| Image circle | Full-frame, APS-C or other coverage. Crop mode can reduce recorded resolution when a smaller-image-circle lens is used. |
| Adapter behaviour | Autofocus modes, aperture control, stabilisation, EXIF and video operation on the exact combination. |
| Minimum focusing distance | Measured from the sensor plane; it is not the same as free working distance in front of the lens. |
| Magnification | The reproduction ratio required for your subject; “close focus” does not necessarily mean 1:1 macro. |
| Stabilisation | Whether the body, lens or both stabilise, and which modes cooperate. |
| Filters and accessories | Filter diameter, hood, tripod collar, focus/zoom controls, support and travel size. |
| Service and firmware | Local repair availability, rental access, updates and support for a used or adapted system. |
What a fast lens does not guarantee
A low maximum f-number does not promise fast autofocus, uniform corner sharpness, low distortion or low weight. “Fast” in this context means a large relative aperture permits a shorter exposure for the same image brightness. In cine lenses, a T-stop additionally accounts for measured light transmission; equal f-numbers can have different transmission losses.
What stabilisation does not do
Stabilisation helps reduce blur from camera movement. It cannot freeze a running child or a bird’s wings. Subject motion still requires an appropriate shutter speed, which may mean more light, a wider aperture or a higher ISO setting. Test your own handheld success rate rather than relying on a universal safe shutter-speed rule.
Budget for results and reliability
Set a complete-system budget rather than spending the entire amount on the body. Reserve money for the lens that matches your subject, suitable memory cards, spare power and dependable storage. Add lighting, audio and support according to the job. Prices and availability vary by market, so this guide deliberately avoids a universal price ladder.
- Before a first purchase: rent or handle the shortlisted camera with the intended lens. Check whether you can comfortably reach the controls and carry the kit.
- Before a used purchase: inspect the sensor, mount, contacts, ports and optics; test autofocus, aperture, stabilisation and recording. Review condition, shutter-use information where relevant, seller terms and repair options.
- Before an upgrade: identify a repeated failure in your current work. Compare whether a lens, light, training session or support accessory fixes it more directly.
- Before a paid assignment: rehearse the complete workflow, use compatible tested cards, configure any simultaneous backup recording, and arrange a replacement for critical equipment.
Keep separate copies after the shoot. A practical backup plan includes multiple copies on different storage, with one off-site copy, and a restore test. Two card slots protect against some recording failures only when configured appropriately; they do not protect against losing the whole camera or deleting both copies during import.
Read the markings and practise
| Marking | What it means |
|---|---|
| 50mm f/1.8 | Fixed 50mm focal length; widest available aperture is f/1.8. |
| 18-55mm f/3.5-5.6 | Zoom range; maximum aperture changes from f/3.5 at the wide end to f/5.6 at the long end. |
| 24-70mm f/2.8 | Zoom range with f/2.8 available throughout. |
| Ø58mm | Filter-thread diameter, not focal length or aperture. |
| 1:1 macro | Life-size maximum reproduction on the sensor. |
An f/1.8 lens can normally be stopped down to f/3.5, f/5.6 and smaller apertures. Its exact minimum aperture depends on the model. A variable-aperture zoom's f/3.5-5.6 marking describes maximum aperture across the zoom range. [3, 14]
Try two controlled photo sequences
1. Arrange the scene. Place a small object in front of a distant background. Keep the object and background stationary. Focus on the same part of the object throughout.
2. Keep the camera position fixed. Photograph at 30mm f/1.8, 30mm f/3.5, 50mm f/1.8 and 50mm f/3.5, if your lenses support these settings. Match brightness using shutter speed or ISO. Compare framing and background blur.
3. Match the subject size. Repeat while moving the camera so the object occupies the same proportion of the frame at 30mm and 50mm. Compare foreground-background proportions and perspective.
4. Inspect the differences. Compare sharpness around the focus point, background blur, field of view and any motion blur. Avoid mistaking a brighter exposure for a shallower depth of field.
For the four-setting example, 30mm f/3.5 provides the widest view and greatest depth of field; 50mm f/1.8 provides the tightest view and shallowest depth of field at the same focus distance.
Three useful comparisons
- Aperture test: same lens, position and focus; change only aperture and compensate exposure. Compare background blur and focus tolerance.
- Viewpoint test: change focal length and move to match subject size. Compare facial or foreground-background proportions.
- Job test: photograph the exact subject in the expected light for the expected duration, then edit and deliver the files. Judge the finished result and reliability, not the specification sheet alone.
Download the 12-page optics companion PDF
The PDF covers the original focal-length and aperture lesson. The camera-selection and profession-specific guidance is expanded here in the web article.
Sources and calculation notes
- Sony — Lens basics
- Edmund Optics — System throughput, f-number and numerical aperture
- Nikon — Understanding maximum aperture
- OpenStax — Refraction - Physics, section 16.2
- OpenStax — Thin lenses - University Physics, section 2.4
- Edmund Optics — Depth of field and depth of focus
- Edmund Optics — The Airy disk and diffraction limit
- Nikon — DX NIKKOR lenses and crop factor
- Canon Academy — Full frame and sensor-size crop factor
- Nikon — Understanding focal length
- Nikon — Experimenting with macro photography at home
- Canon — TS-E 135mm: tilt and focus-plane control
- ZEISS — Anamorphic optics and image characteristics
- Nikon — 18-55mm f/3.5-5.6: a variable-aperture zoom example
- Nikon — How to choose your next mirrorless lens
- Nikon — Choosing a telephoto lens for birding and wildlife
- Sony — Engineering global shutter and understanding rolling-shutter distortion
- Nikon — D850 brochure: simultaneous recording and workflow features
Sources were consulted for this guide on 22 September 2026. Recommendations describe capabilities and trade-offs, not a claim that particular models were tested. Confirm current specifications and availability with the manufacturer and your local supplier.
Calculation assumptions: angles use a 36mm sensor width and infinity-focus rectilinear geometry. Aperture and light-ratio examples assume ideal transmission at ordinary, non-macro distances. Airy-disc values use 550nm light and a circular aperture. Values are rounded.
Depth of field: with f in millimetres, N the f-number, focus distance s = 2,000mm and circle-of-confusion criterion c = 0.03mm: H = f²/(Nc) + f; near = Hs/(H + s − f); far = Hs/(H − s + f). These are conventional geometric approximations, not measurements of an actual lens or a universal perceptual sharpness boundary.